Sunday, October 3, 2010

A Wedding Shower-Inspired Spinach Salad

Yesterday, I got to hang out with friends from the gym to celebrate Britt & Will's engagement and very close wedding. Surprisingly, alcohol was not needed to get me rowdy and goofy. Needless to say, I had a great time.Will's mother was an awesome hostess and made all the food from chicken casserole to turkey chili to some pretty delightful brownies. One thing she made that I fell in love with at first bite was a spinach salad. I could taste spicy mustard and there was bacon and sliced egg in the salad - so you know it was tasty.

After professing my love for her salad, she told me how she made the dressing and I knew I would be making this at home! (I waited a whole 12 hours before giving it a go!) Like most things I cook, I've added some things to make this my own. =)


Spinach Salad

Bag of Spinach (It doesn't matter if it's baby spinach or regular - I used regular today)
6-8 oz Thick Sliced Bacon
8 oz Mushrooms (I used crimini)
3 Large Eggs - hard boiled & sliced

Dressing

≈ 3 Tbsp Spicy Mustard
≈ 2 Tbsp Red Wine Vinegar
1 Onion (I used a sweet onion)
1 - 2 tsp Honey
Salt & Pepper

Cook your bacon & reserve the drippings. I bake mine on wire wracks at 420° for about 15-20 minutes. This prevents the annoying curling and it removes the most grease. Once your bacon is cooked, set it aside. Sauté the mushrooms with a little bit of the bacon fat until they are deliciously tender. (About 5 minutes) Set this aside. Once the bacon's not scalding hot, cut it into about 1" strips. (It's harder to shove a whole piece of bacon in your mouth, unless your my boyfriend...)

Chop the onion into chunks - not too large, you're going to blend this and you don't want the blender to take forever. In your blender, add the onion and blend it until it's a thick, tear-jerking paste. Add 2 - 3 pieces of bacon, 2 tbs of the bacon fat, the vinegar, mustard, & honey. Blend until it's all combined. At this point you can add salt & pepper if you're using it. I recently purchased some Himalayan Sea Salt and had to try it in this. And of course, fresh-cracked pepper - it's really the only way to have pepper!!!
Once the dressing was done, I combined the spinach, bacon, mushrooms, eggs and dressing in a large bowl and mixed with tongs until everything looked pretty evenly distributed. Then I took a quick picture and inhaled my salad.

This is easily addicting!

~Yvie


Photobucket

Thursday, May 27, 2010

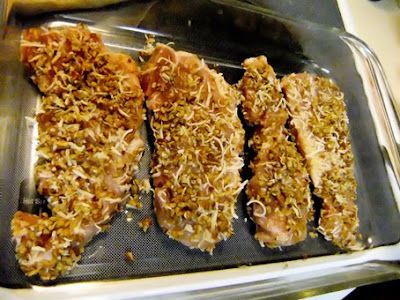
Pecan & Coconut Crusted Pork Chops


So...I am currently taking a Speech class. This week we had to brainstorm and figure out what our Informative & Persuasive speeches will be about - these will be due in about 3 weeks. After going through my list, I decided that I'm going to do my speeches on diet & exercise with a focus on the Paleo diet.

When Ronnie started paleo last year, I got him a book he was interested in:
The Paleo Diet for Athletes
. I asked him to let me borrow it so I can use it for research on my speech. Much to my content, the back of the book is full of Paleo recipes!!! So, after reading just the intro, I flipped to the back and found one I wanted to try: Oven Baked Pecan Pork Chops.

Once I got home, I decided that adding shredded coconut would really make this tasty! The recipe instructs you to cook the chops in a glass pan & flip them half way through the cooking. I didn't much care for the liquid they were sitting in half way through and when I went to flip them, I placed them on a wire wrack, sitting above the pan so that the bottoms wouldn't be soggy.

Ingredients:

1 egg, beaten
2 tbsp olive oil
1 tbsp dry sherry or water (I used water)
Ground ginger
Garlic powder
4 lean pork chops (I used pork loin chops)
1/4 C. finely chopped pecans
1/4 C. shredded, unsweetened coconut

Preheat oven to 350°F. In a bowl, beat egg, oil, water, ginger, & garlic powder. In another bowl, mix the pecans & coconut.


Dip the chops in the egg mixture and then coat with the pecan/coconut mixture.


Place in baking dish and bake for 30 minutes and then flip and continue cooking for another 20 minutes or so.


Yummy!


Photobucket

Monday, April 12, 2010

Know What You're Eating!

I have really tried to be good about tracking what I eat. Lately, I've really tried to be religious with it. At this point, I actually enjoy it. There's something about it - it's like doing a word search. I enjoy it even more when I have to calculate the nutritional information for recipes I make. (I'm being completely serious, by the way.)


If you're trying to be conscious about your diet and how much you're consuming then I recommend getting a scale - preferably a digital scale that will measure ounces & grams! It may seem annoying and tedious at first, but I don't know what I'd do without mine!


I weigh just about all of my food - even my fruit! And I'm on Calorie King, every day! It's not tedious, it's not time consuming, and it's not annoying! It's fun and really worth knowing what I'm eating.


According to John Tesh, it's an eating disorder if you "obsess" over your diet. I disagree. You should be totally obsessed with your diet and what you put into your body. You should be equally obsessed over what your body puts out, in terms of physical fitness.


I make it a point to be mindful of my caloric intake, output, and what I'm actually eating. Yes, a calorie is a calorie - but wouldn't you prefer a healthy source as opposed to one that doesn't benefit your body in any way?


I do weigh what I’m cooking and I write it down. I estimated the nutritional values for the salads I posted in my previous blog. I will over-estimate to ensure that I don’t go over my daily totals; I’m confident that my totals are either really close or on point to actual values.


To calculate the totals, I obtain the nutrition information for all of the ingredients, add these all together and then figure the totals per ounce. Example:


This doesn’t take much time at all and is very handy when I’m portioning out my lunch and dinner. This enables me to stay on track and within my goals. On the days I’m feeling really lazy, I remind myself why I need to continue doing this – my health is important. If I’m not helping myself, then I’m hurting myself and at the end of the day, I’m the only one capable of taking care of me!

Oh, and then I have this to remind me about the direction I want to continue moving in ...


Share

Sunday, April 11, 2010

Trying New Things is Fun and in this case, Delicious!

If you know me, then you know my boyfriend does CrossFit. In the CrossFit community, the Paleo Diet is the preferred diet.

Last year, when he started CrossFit, he didn't immediately jump into the Paleo diet; he did eventually shift over and is now fully Paleo.

Being the girlfriend (
obsessive cook) that I am, I have taken a big interest in this and have spent a lot of time reading & searching for recipes that are entirely Paleo or Paleo-friendly.

This past weekend I accompanied my boyfriend to a gathering at one of his fellow crossfitter's house. I made Paleo desserts for this and left with the desire to make even more Paleo meals!

Leo, one of the owner's of the CrossFit gym my boyfriend goes to, shared two things from a Russian deli. One is simply called Vinegrett which is a fabulous beet salad & I wasn't able to get the name of the other-but it was a delicious combination of roasted eggplant, tomatoes and I think cilantro??? Regardless, my mission today was to recreate both of these as best as possible.

From the various recipes for Vinegrett I found, I saw that it calls for potatoes, carrots, and then varying ingredients. To keep this as Paleo-friendly as possible(
as well as use what I had available at home) I made some minor adjustments. In lieu of potatoes, I used Hearts of Palm - which were a fantastic substitute! I was really happy with my version of this dish!


INGREDIENTS

2 - 15 oz cans of Sliced Beets - (
make sure there is no corn syrup in this! Also, reserve about 2 TBSP - 1/4 cup of the juice.)
1 Clove of Garlic, minced
1/4 of an Onion, mined (
I used a red onion this time, but any onion will do!)
1 can of Hearts of Palm, drained & diced
1 Cup Carrots, diced
Extra Virgin Olive Oil
Apple Cider Vinegar
Splash of Lemon Juice
1 tsp,
or less, Honey
Dill
Freshly Cracked Pepper
Sea Salt (optional)

Steam your diced carrots until they're tender, or as soft as you'd like them. In a bowl or cup, combine the cider vinegar, olive oil, reserved juice, honey and a splash of lemon juice. I didn't measure these out, but typically it's 2 parts oil 1 part of your other liquids - this of course can change too, it's about what's good to you. So I just poured about that amount into my bowl and whisked until everything was thoroughly combined. Add the beets, carrots, hearts of palm, garlic, onion, and season with some dill, pepper & sea salt.

If you have never tried beets and aren't sure if you ever would, I definitely recommend trying them! I don't think that I would have tried them had my boyfriend's sister not convince me to. I'm very happy I did!

I don't know what to call the other dish other than Eggplant Salad.


INGREDIENTS:

2 Eggplants
1 Large can of Diced Tomatoes
1 Clove of Garlic, minced
1/2 Red Onion, Minced
Small bunch of Cilantro, chopped
Olive Oil
Lemon Juice
Cider Vinegar
Freshly Cracked Pepper
Salt (optional)

Preheat your oven to 350° F.

Cut the eggplant into thick slices and cover generously with salt. Rest this on a wire rack and let rest for about an hour. Once the hour has passed, thoroughly rinse all of the salt off of the eggplant and dry it w/ a paper towel. Cut each eggplant slice into quarters and arrange on a large baking sheet. Sprinkle with Salt & Pepper and then Drizzle some olive oil over the eggplant. Bake for 45 min - 1 hour, until the eggplant is completely cooked.

In a separate bowl, combine Olive Oil, Vinegar, and a splash of lemon juice - again I didn't measure this... Whisk until everything is combined. In a different bowl, combine the onions, garlic, tomatoes, cilantro and roasted eggplant. Pour your dressing over this and Stir. Add more pepper & salt to your taste.

These were both really easy and really quick to make (
minus the time it took for eggplant...). Even more important is that they are both healthy and very delicious!

Share

Tuesday, February 2, 2010

Could There be Anthing More Devine? Maybe ...


Last week I thought it would be a good idea to go ahead and try a new frosting recipe. I'm quite fond of my buttercream frosting but I am certainly a fan of variety.

I have seen so many beautiful cupcakes and even heard from others how delightful Swiss Meringue Buttercream tastes. I decided to go ahead give this a try!

It's actually a really easy recipe, if I do say so myself! This particular frosting doesn't use powdered sugar like traditional buttercreams do; instead granulated sugar is dissolved into egg whites over a waterbath. The result is a less sweet, very silky, and delightfully buttery frosting. It's absolutely amazing! After making the first batch I was hooked... I wasn't fond of the second batch, however. After tasting it and having my roommate and neighbor taste it, I realized it was too buttery. This was my fault, I rechecked everything I added and realized I did add too much butter. I fixed this by adding sifted powdered sugar and more extract. Luckily the texture and final flavor was as if I didn't botch up! =)

The recipe itself is very simple as there are really only 3 ingredients (4 if you are adding flavoring). The process it's quite simple too!

Ingredients:

5 oz. Egg Whites (about 5 egg whites)
10 oz. Granulated Sugar
15 oz. Unsalted sweet cream butter cut into pieces & @ room temperature
if adding flavoring it'll be up to you as far as how much you wish to add.

In a large mixing bowl, whisk your egg whites & sugar together w/ a small pinch of salt. Place this bowl over simmering water and whisk, whisk, whisk. You will continue to whisk until the sugar has dissolved completely - don't stop whisking.

Once the Sugar has dissolved, remove the bowl from the heat and attach the whisk attachment to your mixer. Whip the egg whites & sugar until stiff peaks form and the bowl is cool to the touch. (This can take anywhere from 3 to 5 minutes). I found that my bowl wasn't cool enough with one of the batches I made and the butter was melting! If this happens to you, stick the bowl in the freezer and check your frosting often. (Less than 10 minutes later, the frosting was perfect when this happened to me!)

Once your frosting is stiff, this will have some give to it but will definitely hold piping shapes, mix in your flavoring of choice. For the baby shower, I did melted chocolate + cocoa powder for the chocolate buttercream and then Vanilla Bean Paste for the vanilla buttercream.

If you make this, I do recommend tasting the buttercream before the butter is completely incorporated - I would say to start doing this after 2/3 of the butter has been added.

I have heard that there may seem like there's separation of the meringue and the butter as you are adding the butter. This didn't happen to me; however, if it does happen don't worry - it's part of the process and your frosting should still come together smoothly.

If successful, you will have created a satiny smooth frosting that you will surely fall in love with!!! =)

Sunday, January 24, 2010

Pancakes for the Mommy

One of my best friends had a craving for pancakes, yesterday. She got this idea stuck in my head and that was all I could think about today. Around 11:30 or so I woke up and knew that I was going to make pancakes. I sent her a text and shared the good news and she joined me for some lunchtime pancakes!

Next to scrambled eggs, I think pancakes are the next easiest thing to cook up in the kitchen! A few simple ingredients and warm pan = yummy meal! =)

The Ingredients


Gently Mix all Ingredients - don't over mix or the pancakes won't be fluffy!


Cook on Low Heat - the low heat will ensure you don't burn this breakfast treat!


Stack the cooked pancakes on a plate and top each with a pat of yummy butter!


Serve to your friend and make her tastebuds happy! =)